

ảnh minh họa - Đào tạo Android
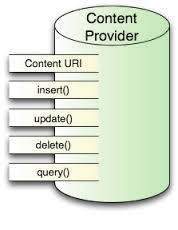
Một thành phần Content Provider cung cấp dữ liệu từ một vận dụng tới các vận dụng khác theo đề nghị. Những đề nghị này được xử lý bởi các phương thức của lớp ContentResolver. Một Content Provider có thể sử dụng các cách khác nhau để lưu giữ dữ liệu và dữ liệu có thể được lưu giữ trong một cơ sở dữ liệu, một file, hoặc có thể ưng chuẩn một mạng..

CONTENTPROVIDER
Đôi khi, việc chia sẽ dữ liệu qua các ứng dụng là thực thụ cấp thiết, khi đó Content Provider trở nên rất bổ ích.
Content Provider giúp bạn tụ hội nội dung trong một vị trí và có nhiều các vận dụng khác nhau có thể truy cập nó khi cấp thiết. Một Content Provider vận hành khá giống một cơ sở dữ liệu, nơi mà bạn có thể truy nã nó, sửa đổi nội dung, cũng như thêm hoặc xóa nội dung bởi dùng các phương thức insert(), update(), delete() và query(). Trong hồ hết tình huống, dữ liệu này được lưu trữ trong một SQlite database.
Một Content Provider được triển khai như là một lớp con của lớp ContentProvider và phải khai triển một tập APIs chuẩn để cho phép các ứng dụng thực hiện các transaction.
public class My Application extends ContentProvider
Content URI trong Android
Để truy vấn một Content Provider, bạn xác định chuỗi truy dạng một URI có định dạng sau:
:////
Bảng sau giải thích chi tiết các phần của URI: −
Phầnthể hiện
prefixLuôn luôn được thiết lập là content://
authorityXác định tên của Content Provider, Ví dụ contacts, browser ... Đối với Content Provider bên thứ ba, nó có thể là tên đầy đủ, ví nhưcom.tutorialspoint.statusprovider
data_typeChỉ kiểu dữ liệu mà Provider cụ thể cung cấp. tỉ dụ, nếu bạn đang lấy tuốt tuột contact từ Content Provider có tên là Contacts, thì dữ liệu sẽ là people và URI sẽ như thế này content://contacts/people
idXác định bản ghi cụ thể được đề nghị. Ví dụ, nếu bạn đang tìm số số liên tưởng thứ 5 trong Coctacts thì URI sẽ như thế nàycontent://contacts/people/5.
Tạo Content Provider trong Android
Để tạo riêng cho mình một Content Provider, bạn theo 5 bước sau:
Đầu tiên, bạn cần tạo một lớp Content Provider mà kế thừa từ lớp cơ sởContentProviderbaseclass.
Thứ hai, bạn cần định tha ma chỉ URI của Content Provider, sẽ được dùng để truy cập nội dung đó.
Tiếp theo, bạn sẽ cần tạo Database cho riêng bạn để giữ nội dung này. Thường thì, Android sử dụng SQLite Database và framework cần thiết để ghi đè phương thức onCreate() sẻ dùng phương thức SQLite Open Helper để tạo và mở Database của Provider này. Khi ứng dụng của bạn chạy, phương thức onCreate() được gọi trên mỗi luồng vận dụng chính.
Kế tiếp, bạn sẽ phải khai triển các truy hỏi Content Provider để thực hành các hoạt động cơ sở dữ liệu cụ thể.
rút cuộc, đăng ký Content Provider của bạn trong activity file bởi sử dụng thẻ .
Sau đây là danh sách bạn cần ghi đè trong lớp Content Provider:
CONTENTPROVIDER
onCreate() Phương thức này được gọi khi Provider được bắt đầu.
query() Phương thức này nhận một đề nghị từ người dùng. Kết quả được trả về dưới dạng một đối tượng Cursor.
insert()Phương thức này chèn một bản ghi mới vào trong Content Provider.
delete() Phương thức này xóa một bản ghi đang tồn tại từ Content Provider.
update() Phương thức này cập nhật một bản ghi đang tồn tại trong Content Provider.
getType() Phương thức này trả về kiểu MIME của dữ liệu tại URI đã cho.
tỉ dụ
Ví dụ sau giảng giải cách bạn tạo cho riêng mình một ContentProvider. Bạn theo các bước na ná như khi tạo thí dụ Hello World.−
Bướctrình diễn.#
1Bạn dùng Android StudioIDE để tạo một áp dụng Android có tên My Application dưới một package com.example.My Application, with blank Activity.
2Sửa đổi MainActivity.java để thêm hai phương thức mới onClickAddName() vàonClickRetrieveStudents().
3Tạo StudentsProvider.java mới dưới package com.example.My Application để định nghĩa Provider của bạn và các phương thức được gắn kết
4Đăng ký Content Provider trong AndroidManifest.xml file của bạn bởi dùng thẻ
5Sửa đổi nội dung mặc định củares/layout/activity_main.xml để bao một GUI để thêm các bản ghi về student
6Không cấp thiết sửa đổi string.xml file, Android Studio sẽ để ý nó
7Chạy áp dụng để chạy Android Emulator và thẩm tra kết quả các đổi thay đã thực hành trong ứng dụng
Sau đây là nội dung của src/com.example.My Application/MainActivity.java. đã được sửa đổi. File này có thể bao các phương thức cơ bản. Chúng ta đã thêm hai phương thức onClickAddName() và onClickRetrieveStudents() để xử lý tương tác người dùng với vận dụng.
package com.example.My Application;import android.net.Uri;import android.os.Bundle;import android.app.Activity;import android.content.ContentValues;import android.content.CursorLoader;import android.database.Cursor;import android.view.Menu;import android.view.View;import android.widget.EditText;import android.widget.Toast;public class MainActivity extends Activity @Override protected void onCreate(Bundle savedInstanceState) super.onCreate(savedInstanceState); setContentView(R.layout.activity_main); @Override public boolean onCreateOptionsMenu(Menu menu) getMenuInflater().inflate(R.menu.main, menu); return true; public void onClickAddName(View view) // Add a new student record ContentValues values = new ContentValues(); values.put(StudentsProvider.NAME, ((EditText)findViewById(R.id.editText2)).getText().toString()); values.put(StudentsProvider.GRADE, ((EditText)findViewById(R.id.editText3)).getText().toString()); Uri uri = getContentResolver().insert( StudentsProvider.CONTENT_URI, values); Toast.makeText(getBaseContext(), uri.toString(), Toast.LENGTH_LONG).show(); public void onClickRetrieveStudents(View view) // Retrieve student records String URL = "content://com.example.provider.College/students"; Uri students = Uri.parse(URL); Cursor c = managedQuery(students, null, null, null, "name"); if (c.moveToFirst()) do Toast.makeText(this, c.getString(c.getColumnIndex(StudentsProvider._ID)) + ", " + c.getString(c.getColumnIndex( StudentsProvider.NAME)) + ", " + c.getString(c.getColumnIndex( StudentsProvider.GRADE)), Toast.LENGTH_SHORT).show(); while (c.moveToNext());
Tạo một StudentsProvider.java mới dưới package là com.example.My Application và đây là nội dung của src/com.example.My Application/StudentsProvider.java −
package com.example.My Application;import java.util.HashMap;import android.content.ContentProvider;import android.content.ContentUris;import android.content.ContentValues;import android.content.Context;import android.content.UriMatcher;import android.database.Cursor;import android.database.SQLException;import android.database.sqlite.SQLiteDatabase;import android.database.sqlite.SQLiteOpenHelper;import android.database.sqlite.SQLiteQueryBuilder;import android.net.Uri;import android.text.TextUtils;public class StudentsProvider extends ContentProvider static final String PROVIDER_NAME = "com.example.provider.College"; static final String URL = "content://" + PROVIDER_NAME + "/students"; static final Uri CONTENT_URI = Uri.parse(URL); static final String _ID = "_id"; static final String NAME = "name"; static final String GRADE = "grade"; private static HashMap<String, String> STUDENTS_PROJECTION_MAP; static final int STUDENTS = 1; static final int STUDENT_ID = 2; static final UriMatcher uriMatcher; static uriMatcher = new UriMatcher(UriMatcher.NO_MATCH); uriMatcher.addURI(PROVIDER_NAME, "students", STUDENTS); uriMatcher.addURI(PROVIDER_NAME, "students/#", STUDENT_ID); /** * Database specific constant declarations */ private SQLiteDatabase db; static final String DATABASE_NAME = "College"; static final String STUDENTS_TABLE_NAME = "students"; static final int DATABASE_VERSION = 1; static final String CREATE_DB_TABLE = " CREATE TABLE " + STUDENTS_TABLE_NAME + " (_id INTEGER PRIMARY KEY AUTOINCREMENT, " + " name TEXT NOT NULL, " + " grade TEXT NOT NULL);"; /** * Helper class that actually creates and manages * the provider's underlying data repository. */ private static class DatabaseHelper extends SQLiteOpenHelper DatabaseHelper(Context context) super(context, DATABASE_NAME, null, DATABASE_VERSION); @Override public void onCreate(SQLiteDatabase db) db.execSQL(CREATE_DB_TABLE); @Override public void onUpgrade(SQLiteDatabase db, int oldVersion, int newVersion) db.execSQL("DROP TABLE IF EXISTS " + STUDENTS_TABLE_NAME); onCreate(db); @Override public boolean onCreate() Context context = getContext(); DatabaseHelper dbHelper = new DatabaseHelper(context); /** * Create a write able database which will trigger its * creation if it doesn't already exist. */ db = dbHelper.getWritableDatabase(); return (db == null)? false:true; @Override public Uri insert(Uri uri, ContentValues values) /** * Add a new student record */ long rowID = db.insert( STUDENTS_TABLE_NAME, "", values); /** * If record is added successfully */ if (rowID > 0) Uri _uri = ContentUris.withAppendedId(CONTENT_URI, rowID); getContext().getContentResolver().notifyChange(_uri, null); return _uri; throw new SQLException("Failed to add a record into " + uri); @Override public Cursor query(Uri uri, String[] projection, String selection,String[] selectionArgs, String sortOrder) SQLiteQueryBuilder qb = new SQLiteQueryBuilder(); qb.setTables(STUDENTS_TABLE_NAME); switch (uriMatcher.match(uri)) case STUDENTS: qb.setProjectionMap(STUDENTS_PROJECTION_MAP); break; case STUDENT_ID: qb.appendWhere( _ID + "=" + uri.getPathSegments().get(1)); break; default: throw new IllegalArgumentException("Unknown URI " + uri); if (sortOrder == null @Override public int delete(Uri uri, String selection, String[] selectionArgs) int count = 0; switch (uriMatcher.match(uri)) case STUDENTS: count = db.delete(STUDENTS_TABLE_NAME, selection, selectionArgs); break; case STUDENT_ID: String id = uri.getPathSegments().get(1); count = db.delete( STUDENTS_TABLE_NAME, _ID + " = " + id + (!TextUtils.isEmpty(selection) ? " AND (" + selection + ')' : ""), selectionArgs); break; default: throw new IllegalArgumentException("Unknown URI " + uri); getContext().getContentResolver().notifyChange(uri, null); return count; @Override public int update(Uri uri, ContentValues values, String selection, String[] selectionArgs) int count = 0; switch (uriMatcher.match(uri)) case STUDENTS: count = db.update(STUDENTS_TABLE_NAME, values, selection, selectionArgs); break; case STUDENT_ID: count = db.update(STUDENTS_TABLE_NAME, values, _ID + " = " + uri.getPathSegments().get(1) + (!TextUtils.isEmpty(selection) ? " AND (" +selection + ')' : ""), selectionArgs); break; default: throw new IllegalArgumentException("Unknown URI " + uri ); getContext().getContentResolver().notifyChange(uri, null); return count; @Override public String getType(Uri uri) switch (uriMatcher.match(uri)) /** * Get all student records */ case STUDENTS: return "vnd.android.cursor.dir/vnd.example.students"; /** * Get a particular student */ case STUDENT_ID: return "vnd.android.cursor.item/vnd.example.students"; default: throw new IllegalArgumentException("Unsupported URI: " + uri);
Còn đây là nội dung đã được sửa đổi của AndroidManifest.xml file. Ở đây, chúng ta đã thêm thẻ để bao Content Provider của chúng ta:
xml version="1.0" encoding="utf-8"?> xmlns:android="http://schemas.android.com/apk/res/android" package="com.example.My Application" android:versionCode="1" android:versionName="1.0" > android:minSdkVersion="8" android:targetSdkVersion="22" /> android:allowBackup="true" android:icon="@drawable/ic_launcher" android:label="@string/app_name" android:theme="@style/AppTheme" > android:name="com.example.My Application.MainActivity" android:label="@string/app_name" > android:name="android.intent.action.MAIN" /> android:name="android.intent.category.LAUNCHER" /> ="com.example.provider.College">
Dưới đây là nội dung của res/layout/activity_main.xml file để bảo một button để phát Custom Intent. −
xmlns:android="http://schemas.android.com/apk/res/android" xmlns:tools="http://schemas.android.com/tools" android:layout_width="match_parent" android:layout_height="match_parent" android:paddingLeft="@dimen/activity_horizontal_margin" android:paddingRight="@dimen/activity_horizontal_margin" android:paddingTop="@dimen/activity_vertical_margin" android:paddingBottom="@dimen/activity_vertical_margin" tools:context=".MainActivity"/"> android:id="@+id/textView1" android:layout_width="wrap_content" android:layout_height="wrap_content" android:text="Content provider" android:layout_alignParentTop="true" android:layout_centerHorizontal="true" android:textSize="30dp" /> android:id="@+id/textView2" android:layout_width="wrap_content" android:layout_height="wrap_content" android:text="Tutorials point " android:textColor="#ff87ff09" android:textSize="30dp" android:layout_below="@+id/textView1" android:layout_centerHorizontal="true" /> android:layout_width="wrap_content" android:layout_height="wrap_content" android:id="@+id/imageButton" android:src="@drawable/abc" android:layout_below="@+id/textView2" android:layout_centerHorizontal="true" /> android:layout_width="wrap_content" android:layout_height="wrap_content" android:id="@+id/button2" android:text="Add Name" android:layout_below="@+id/editText3" android:layout_alignRight="@+id/textView2" android:layout_alignEnd="@+id/textView2" android:layout_alignLeft="@+id/textView2" android:layout_alignStart="@+id/textView2" android:onClick="onClickAddName"/> android:layout_width="wrap_content" android:layout_height="wrap_content" android:id="@+id/editText" android:layout_below="@+id/imageButton" android:layout_alignRight="@+id/imageButton" android:layout_alignEnd="@+id/imageButton" /> android:layout_width="wrap_content" android:layout_height="wrap_content" android:id="@+id/editText2" android:layout_alignTop="@+id/editText" android:layout_alignLeft="@+id/textView1" android:layout_alignStart="@+id/textView1" android:layout_alignRight="@+id/textView1" android:layout_alignEnd="@+id/textView1" android:hint="Name" android:textColorHint="@android:color/holo_blue_light" /> android:layout_width="wrap_content" android:layout_height="wrap_content" android:id="@+id/editText3" android:layout_below="@+id/editText" android:layout_alignLeft="@+id/editText2" android:layout_alignStart="@+id/editText2" android:layout_alignRight="@+id/editText2" android:layout_alignEnd="@+id/editText2" android:hint="Grade" android:textColorHint="@android:color/holo_blue_bright" /> android:layout_width="wrap_content" android:layout_height="wrap_content" android:text="Retrive student" android:id="@+id/button" android:layout_below="@+id/button2" android:layout_alignRight="@+id/editText3" android:layout_alignEnd="@+id/editText3" android:layout_alignLeft="@+id/button2" android:layout_alignStart="@+id/button2" android:onClick="onClickRetrieveStudents"/>
bảo đảm bạn có nội dung sau của res/values/strings.xml file:
xml version="1.0" encoding="utf-8"?> name="app_name">My Application name="action_settings">Settings;
Chạy áp dụng Android vừa tạo ở trên.
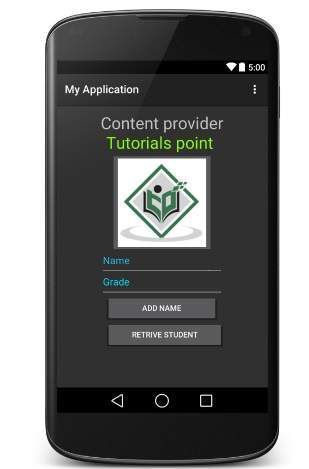
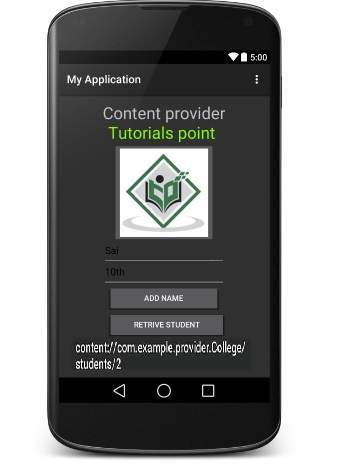
hiện giờ, bạn thử nhập mộtName và Grade của một student và rốt cuộc nhấn nút Add Name nó sẽ thêm bản ghi student đó vào trong Database và sẽ hiện một thông báo tại cuối màn hình để hiển thị ContentProvider URI cùng với số bản ghi đã thêm vào Database. Hoạt động này sử dụng phương thức insert(). Bạn thử lặp lại tiến trình này để nhập thêm một số student nữa vào cơ sở dữ liệu của Content Provider.
Một khi bạn đã nhập một số bản ghi vào Database, lúc này, giả thử bạn muốn yêu cầu ContentProvider cung cấp cho chúng ta các bản ghi đó. Bạn chỉ cần nhấn nút Retrieve Students, sẽ lấy và hiển thị toàn bộ bản ghi (từng bản ghi một) theo trình khai triển của phương thức query() .
Bạn có thể viết các Activity với các hoạt động cập nhật và xóa bằng cách cung cấp các hàm trong MainActivity.java file và sau đó sửa đổi giao diện UI để có các nút cho các hoạt động update và delete này theo cách tương tự chúng ta đã làm với các hoạt động thêm và đọc.
Theo cách này, bạn có thể dùng ContentProvider đang tồn tại là Address Book hoặc bạn có thể sử dụng khái niệm Content Provider để phát triển một áp dụng hướng cơ sở dữ liệu (Database Oriented) đẹp, ở đó bạn có thể thực hành ắt các hoạt động trên cơ sở dữ liệu như read, write, update, và delete như đã giải thích trong Ví dụ trên.
No comments:
Post a Comment